This is a textual version of Ways to Speed Up Blender Cycles Rendering, hope Andrew won’t mind me writing a textual version of his video. ;) This post is mostly for self-reference and does not contains all the methods shown by Andrew.
We’ll see how we can create better renders and how render times can be reduced by merely changing some factory settings, and also what prices we might have to pay for that optimization.
Reduce Light Bounces
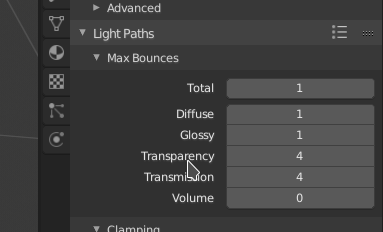
While light bounces bring realism, it is a processor intensive task. You must keep it lower while still maintaining the realistic output. No light bounces (global illumination) can render the scene as unrealistic or cartoonish. One bounce is enough until you are rendering glass. In that case, you can set the global setting to 1 bounce and transparency to 3-4. This setting can be found under Render Tab > Light Paths.

Use Portal
When you are making an interior scene, in which there is a window from where light (area) is coming. It’s better to use the area light as a portal. Doing it does not do all the calculations of light which is being outside the window and the building.
This can help keep samples 2x low, while grain still in control.

Use GPU
Not to remind, if you have GPU, use it. By default, this setting is set to CPU which most newcomers don’t notice.

If you have a GPU, but still can’t see GPU in these setting. You might have to enable it from system setting.

Change Tile Size
When rendering with CPU, use lower tile size (because multiple threads can render different part of the frame simultaneously). While on GPU you have kinda 1 tile at a time to work on (Until you got two GPU, in that case, you’ll have 2 tiles at a given time). 512512 would be good for GPU. On the other hand, 3232 would be good for the CPU. When you buy a new GPU, do some tests to get to know your GPU’s optimal tile size.

Reduce Samples
Reducing sample can give you grain. There’s a point where sample going any high is pointless. Lower it until you start to see the grain. Compensating samples for grain is not always the best. There could be another reason causing the grain. Increasing samples will just increase the render time.

Denoise
Starting from Blender 2.79, you can use the denoise feature in cycles. Tweak with settings to see what works for you better.

Clamp
Clamping can get rid of fireflies. But with a cost. It kills lighting. It removes noise in fewer samples. Use it if all other noise reduction method fails. This setting can be found inside the Render > Light Path > Clamping.

Caustics
Make sure refractive and reflective caustics are turned off unless necessary. By default, it’s turned off. Settings can be found inside Render > Light Paths > Caustics.

Object Instancing
Use it whenever possible. Imagine multiple trees in a forest. GPU/CPU have to cache some texture and mesh data. And when it does it for every tree, there is goes resource hungry. Duplicating instead of instancing increases memory usage and render time. With only one tree, you can drop the resource usage drastically.
Read more about it here and here.
Adaptive Subdivision
Another option to enable to reduce resource usage. Based on how close objects to the camera, it decides to keep the meshes low poly and high poly. Meshes close the camera are high poly. Settings can be found inside the subdivision modifier.
You might have to enable experimental feature set in Cycles for this setting to appear.

See also:
Subscribe to blog for more updates like this one.