Introduction
I have been tinkering with this new framework and have a little bit of experience with FastAPI as of now. What I’ve though of is to do a post about authentication and authorization. I’m sure going to do a registration and login system and nothing fancy this time. I am going to use JWT as authorization mechanism. This is mostly a walkthrough of new features in Python.
I will not go in-depth in any of the topics, but will provide you with links which you can dig up to expand your knowledge.
Series Index
- Project Setup and FastAPI introduction (you are here)
- Database Setup and User Registration
- Fix the failing test with mocking and dependency injection
- Authentication Premier and Login Endpoint
Prerequisite
This post is fairly easy and even beginners can follow it. Following are some packages which I will be using in this post.
- Python as a language
pytestas a test runner- FastAPI as application layer
- PostgreSQL as database layer
psycopg2, the database connector- SQLAlchemy for ORM
- Docker for PostgreSQL
Make sure Python and Docker are installed on your system. You should be able to do a docker run hello-world and python -V without error. Please avoid installing Python 2. Leave a comment if you are stuck, then I can do something.
If you are following this tutorial on Windows, I expect you to be working in WSL. On Mac, there should be no issue. For every other installation, follow along with me. Feel free to connect with me on LinkedIn or drop a “Hi” on Twitter.
Setting up the project
Setup a virtual environment
Issue this command to your terminal.
$ python3 -m venv .venv
You should get back the prompt after a few seconds, depending on how fast your system is.
You should be able to see a .venv directory like shown below.
$ ls -la
total 12
drwxrwxr-x  3 ec2-user ec2-user 6144 Nov 11 13:12 ./
drwxrwxr-x 21 ec2-user ec2-user 6144 Nov 11 12:56 ../
drwxrwxr-x  5 ec2-user ec2-user 6144 Nov 11 13:12 .venv/
To get into the virtual environment, do:
$ source .venv/bin/activate
The prompt will be prepended with (.venv). In my case, my customized full prompt looks like this:
(.venv) ec2-user at ip-10-2-1-250 in ~/workspace/fastauth $
As you can see, I have created a directory called fastauth, which is root of this project. Please also take note that from now on, whenever I run any command, I’m inside this virtual environment. So you should be too.
Hello World in FastAPI
Let’s take a TDD approach and write our test first. The requirements of our first endpoint are:
- Request to
/pingshould respond with a HTTP 200 status. - Request to
/pingshould respond with a custom JSON:{"msg": "pong"}.
Let’s write our first test:
| |
Save above to a file called test_main.py.
Run the test
To run the test, you need to have pytest installed.
pip install pytest
Now run the test..
$ pytest
=========================== test session starts ===========================
platform linux -- Python 3.7.10, pytest-6.2.5, py-1.11.0, pluggy-1.0.0
rootdir: /efs/repos/fastauth
collected 0 items / 1 error

================================= ERRORS ==================================
______________________ ERROR collecting test_main.py ______________________
ImportError while importing test module '/efs/repos/fastauth/test_main.py'.
Hint: make sure your test modules/packages have valid Python names.
Traceback:
/usr/lib64/python3.7/importlib/__init__.py:127: in import_module
    return _bootstrap._gcd_import(name[level:], package, level)
test_main.py:1: in <module>
    from fastapi.testclient import TestClient
E   ModuleNotFoundError: No module named 'fastapi'
========================= short test summary info =========================
ERROR test_main.py
!!!!!!!!!!!!!!!!! Interrupted: 1 error during collection !!!!!!!!!!!!!!!!!!
============================ 1 error in 0.17s =============================
The first error we would receive is this ModuleNotFoundError with a message No module named 'fastapi'. That’s because we really don’t have anything in our virtual environment other than pytest.
We are doing good with our TDD approach. We are following the red, green, refactor approach. In this approach we first write test to fail the test. Then we write the minimal code to pass the test (green resembles passed test). In third step we refactor redundant code.
Moving forward, let’s get rid of this ImportError by installing fastapi in our virtual environment and run the test again.
$ pip install fastapi
[..output trimmed..]

$ pytest
This time I’m not going to show you the entire output, but the final line says:
import requests
ModuleNotFoundError: No module named 'requests'
That a red again.
Let’s install the required package and try again.
$ pip install requests
[..output trimmed..]

$ pytest
The error this time is different:
from main import app
ModuleNotFoundError: No module named 'main'
That’s because we haven’t created the main.py file yet. Let’s go ahead and create one and run the test again:
$ touch main.py

$ pytest

from main import app
ImportError: cannot import name 'app' from 'main' (.../fastauth/main.py)
Minimal code to pass the test
We are yet again going to write minimal code to pass this test. Open up a file called main.py and write this:
| |
Let’s run the test this time:
$ pytest -q
F                                                           [100%]
============================ FAILURES =============================
____________________________ test_ping ____________________________

    def test_ping():
        response = client.get("/ping")
>       assert response.status_code == 200
E       assert 404 == 200
E        +  where 404 = <Response [404]>.status_code

test_main.py:9: AssertionError
===================== short test summary info =====================
FAILED test_main.py::test_ping - assert 404 == 200
1 failed in 0.78s
Now this time we get some real error. We are getting a HTTP 404 error, that’s because that endpoint is not defined yet. That makes me really happy. I got some real error.
I will go ahead and add route and route handler:
| |
Some explanation of the code now:
- What are can do with
appis, we can wrap a handler function with it. The handler function above simply return the string'Hello World'. - Let’s look at the
@app.get("/ping")part now./pingis the route here.getis the GET operation on the endpoint.
How about running the test again?
$ pytest -q
F                                                                                            [100%]
============================================= FAILURES =============================================
____________________________________________ test_ping _____________________________________________

    def test_ping():
        response = client.get("/ping")
        assert response.status_code == 200
>       assert response.json() == {"msg": "pong"}
E       AssertionError: assert 'Hello World!' == {'msg': 'pong'}
E        +  where 'Hello World!' = <bound method Response.json of <Response [200]>>()
E        +    where <bound method Response.json of <Response [200]>> = <Response [200]>.json

test_main.py:10: AssertionError
===================================== short test summary info ======================================
FAILED test_main.py::test_ping - AssertionError: assert 'Hello World!' == {'msg': 'pong'}
Yeah! Seems like the first assertion passed. What it did not pass is the response message.
Let’s correct that.
| |
And the output:
$ pytest -q
.                                                   [100%]
1 passed in 0.53s
Related reading: https://fastapi.tiangolo.com/tutorial/testing/
FastAPI has support for OpenAPI, builtin.
One good thing among many about FastAPI is that, you don’t have to install Swagger separately. You can import and export the specs without much hassle. Let’s see what FastAPI has to offer. But before that, let’s start our development server.
We were, till now, not running the actual server. But were testing the routes. To run the actual server, we need a companion package of FastAPI called uvicorn.
pip install uvicorn
and then run this command:
$ uvicorn main:app --reload
Let’s see what it does.
uvicornis the command to start the ASGI server interface.- What we are passing to uvicorn is
main:appwhich is the module:app (app here is the FastAPI instance). - Basically what
--reloaddoes is, it reloads the new content from disk when file is updated on disk.
Below is the mine output.
INFO:     Will watch for changes in these directories: ['/home/ec2-user/workspace/fastauth']
INFO:     Uvicorn running on http://127.0.0.1:8000 (Press CTRL+C to quit)
INFO:     Started reloader process [20670] using statreload
INFO:     Started server process [20672]
INFO:     Waiting for application startup.
INFO:     Application startup complete.
As you can see the output from the console, our server started on http://127.0.0.1:8000. So we should be able to see our ping response on http://127.0.0.1:8000/ping

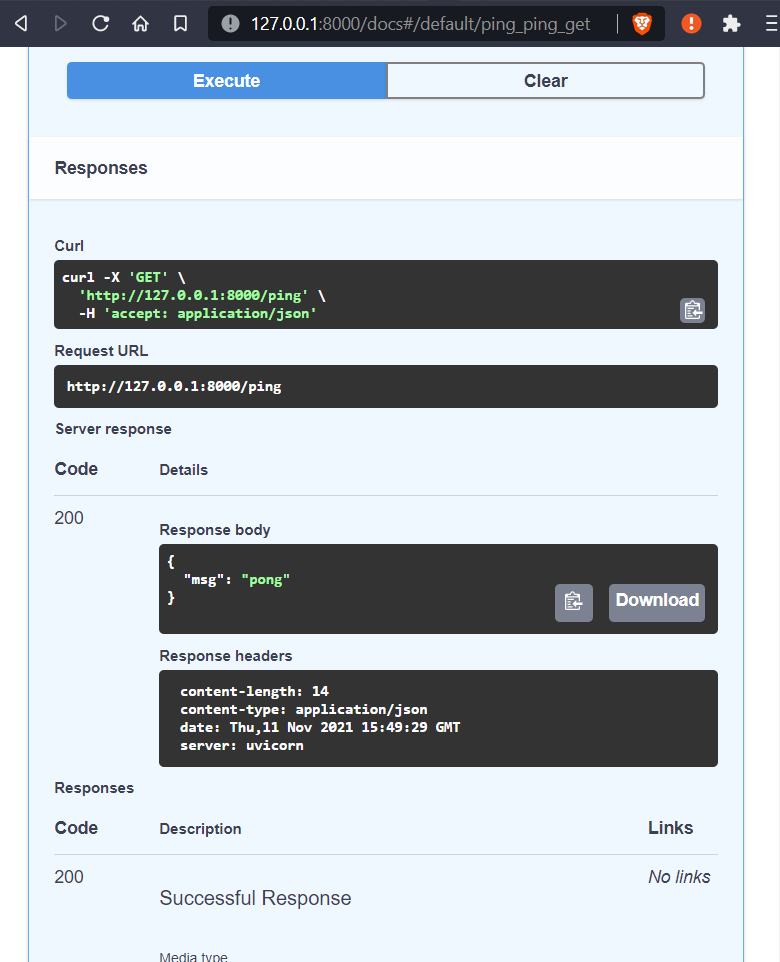
What fun thing you could do with FastAPI is, nagivate to the SwaggerUI at http://127.0.0.1:8000/docs.
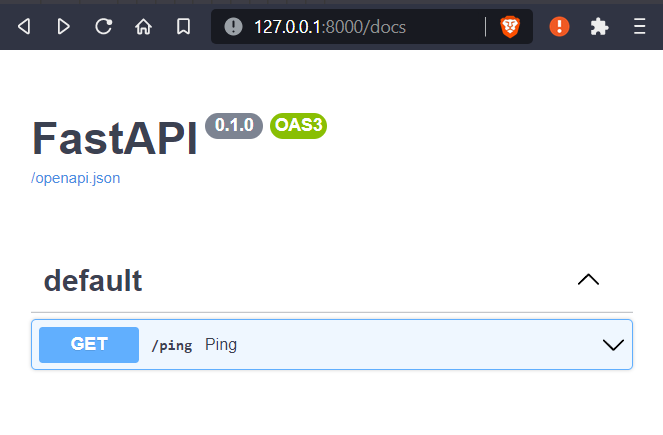
And play around:
You may want to download the OpenAPI spec from http://127.0.0.1:8000/openapi.json if you wish. This file will get populated as we follow this tutorial/series.
In next section in this series, I’ll show you how to setup database and proceed with user registration. To keep getting updates on my blog posts, please subscribe to my newsletter below.
